
Bien que vieillissante et en perte de vitesse, Active Directory est toujours utilisée dans beaucoup d’entreprises.
Dans ce post, nous allons voir comment ajouter un attribut personnalisé dans le schéma d’active directory.
Beaucoup d’attributs “custom” sont déjà disponibles dans le schéma de nos Active Directory, cependant il est toujours utile de pouvoir en ajouter de nouveau à des fins précises. Active Directory est avant tout un annuaire puissant et personnalisable dans la limite du raisonnable.
Dans cette exemple nous allons simplement ajouter sur la classe “user” un attribut nommé “ctxPassphrase”.
Prérequis
Comme d’habitude quand il s’agit de manipuler le schéma Active Directoy, il convient d’utiliser un compte de type “Schema Admins” et de lancer les opérations depuis le Contrôleur de Domaine possédant le rôle “Schema master”.

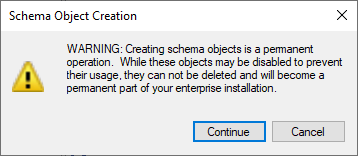
Les opérations réalisées sur le schéma AD sont définitives, il est presque impossible de supprimer une extension du schéma. Inutile de préciser d’un petit backup de l’AD avant une opération en prod n’est pas de trop.
Pour identifier le serveur qui héberge le rôle FSMO “Schema master”, lancer la commande :
netdom query fsmo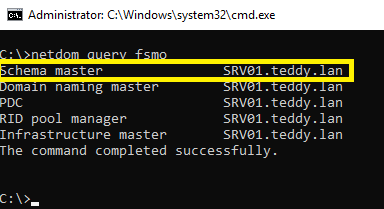
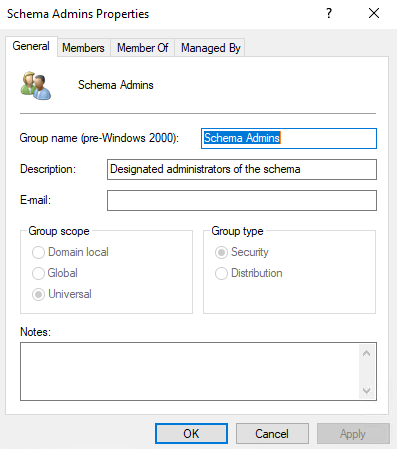
Vous devez aussi être membre du groupe “Schema Admins” :

A partir de maintenant, l’ensemble des actions seront réalisées depuis le DC qui héberge le rôle FSMO “Schema master”
Accèder au schéma AD
Le schéma Active Directory est accessible et manipulable depuis une console MMC. Il convient d’enregistrer celle-ci afin de pour y accéder.
Pour ce faire lancer la commande :
regsvr32 schmmgmt.dll
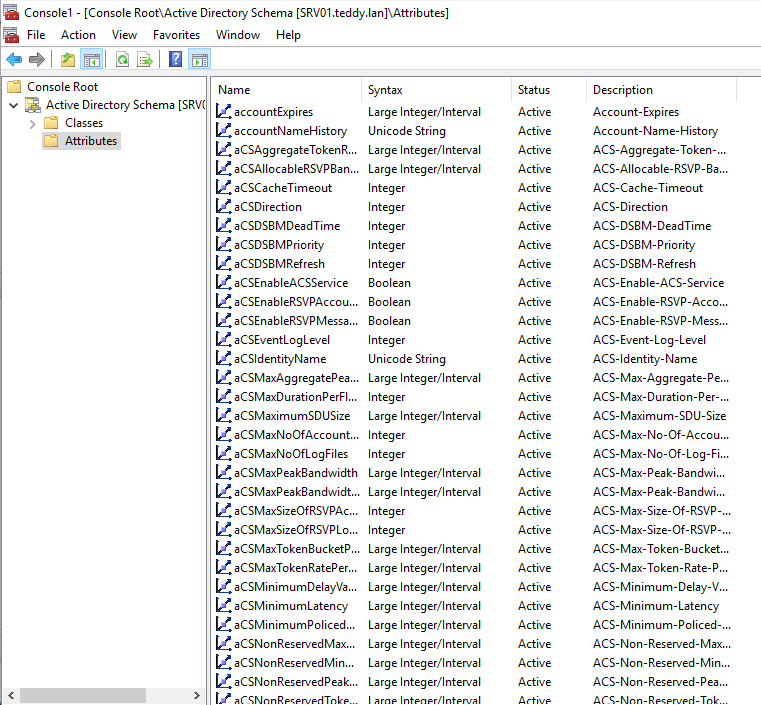
Ouvrir la console “mmc.exe” et importer le snap-in “Active Directory Schema” :
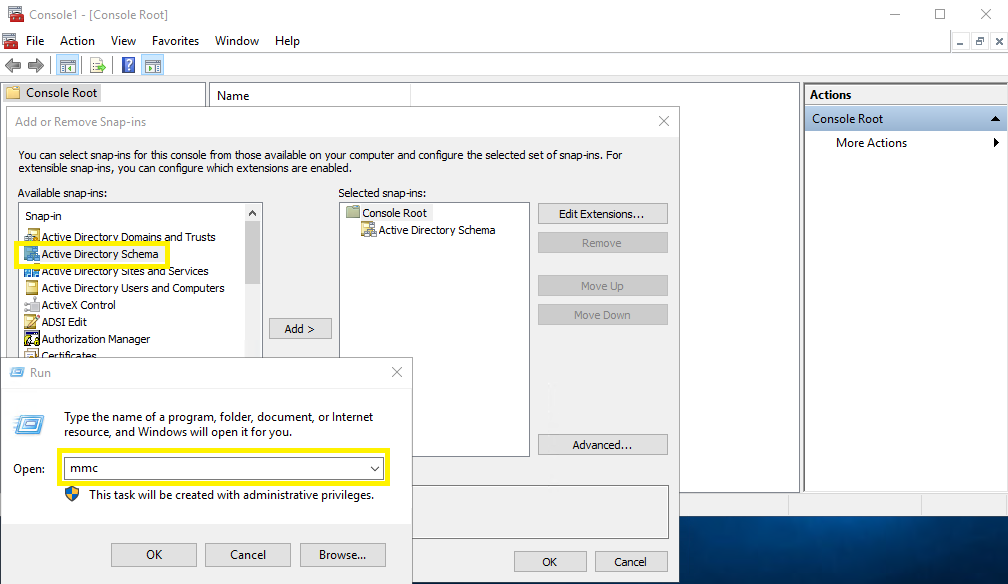
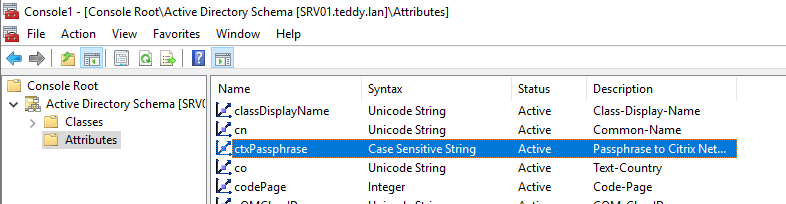
Nous voilà dans le schéma Active Directory 🙂
Rappelons que le schéma AD est unique à la forêt AD et pas au domaine. Attention donc à la portée des modifications réalisées.
Rappels sur les OID
Avant de continuer, il convient de faire un petit rappel sur les OID. En effet, chaque attribut AD est identifié par un identifier qui lui est propre et unique l’OID (Object IDentifier).
Les OID sont gérés par un organisme l’IANA.
Pour créer notre propre attribut, deux possibilités s’offrent à nous :
- Demander une plage d’OID à l’IANA.
- Utiliser les OID Microsoft.
La demande d’OID à l’IANA est gratuite, que vous êtes éditeur de logiciels et souhaitez protée votre extension de schéma chez vos clients.
Dans notre cos, nous allons utiliser les OID Microsoft.
En effet Micorsoft est de plusieurs plages d’OID, notamment la plage “1.2.840.113556”.
Les OID sont organisés en système hiérarchique séparée pas de “.“.
La plage d’OID qui nous intéresse est “1.2.840.113556.1.8000”, en effet la plage 8000 est une plage laissé libre par Microsoft pour les attributs custom de ses clients. C’est dans une sous plage de cet OID que nous allons consommer nos futurs OID.
Pour plus d’informations et par curiosité, je vous invite à partourir :
Création de l'attribut custom
De retour sur la console MMC “Active Directory Schema” :
- Clic droit sur “Attributes” –> “Create Attribute …”.

Renseigner les informations demandées:
- Common Name: Nom de l’attribut.
- LDAP Display Name : Nom vu par l’AD (par simplicité, laisser le même nom que le “Common Name”).
- OID : Nous allons voir juste plus en dessous comment générer celui-ci.
- Description : Une petite description de l’attribut pour savoir à qui il correspond.
- Syntax : Type de valeur contenue par l’attribut (integer, string …).
- Min / Max : dépends de la syntax choisie.

Générer un OID
Nous allons donc générer notre OID pour ce nouvel attribut.
Pour ce faire, lancer le script VBS ci-dessous:
' oidgen.vbs
'
' THIS CODE AND INFORMATION IS PROVIDED "AS IS" WITHOUT WARRANTY OF ANY KIND, EITHER EXPRESSED
' OR IMPLIED, INCLUDING BUT NOT LIMITED TO THE IMPLIED WARRANTIES OF MERCHANTABILITY AND/OR
' FITNESS FOR A PARTICULAR PURPOSE.
'
' Copyright (c) Microsoft Corporation. All rights reserved
' Improvements made by Ryein C. Goddard
'
' This script is not supported under any Microsoft standard support program or service.
' The script is provided AS IS without warranty of any kind. Microsoft further disclaims all
' implied warranties including, without limitation, any implied warranties of merchantability
' or of fitness for a particular purpose. The entire risk arising out of the use or performance
' of the scripts and documentation remains with you. In no event shall Microsoft, its authors,
' or anyone else involved in the creation, production, or delivery of the script be liable for
' any damages whatsoever (including, without limitation, damages for loss of business profits,
' business interruption, loss of business information, or other pecuniary loss) arising out of
' the use of or inability to use the script or documentation, even if Microsoft has been advised
' of the possibility of such damages.
' ----------------------------------------------------------------------
Function GenerateOID()
    'Initializing Variables
    Dim guidString, oidPrefix
    Dim guidPart0, guidPart1, guidPart2, guidPart3, guidPart4, guidPart5, guidPart6
    Dim oidPart0, oidPart1, oidPart2, oidPart3, oidPart4, oidPart5, oidPart6
    On Error Resume Next
    'Generate GUID
    Set TypeLib = CreateObject("Scriptlet.TypeLib")
    guidString = TypeLib.Guid
    'If no network card is available on the machine then generating GUID can result with an error.
    If Err.Number <> 0 Then
        Wscript.Echo "ERROR: Guid could not be generated, please ensure machine has a network card."
        Err.Clear
        WScript.Quit
    End If
    'Stop Error Resume Next
    On Error GoTo 0
    'The Microsoft OID Prefix used for the automated OID Generator
    oidPrefix = "1.2.840.113556.1.8000.2554"
    'Split GUID into 6 hexadecimal numbers
    guidPart0 = Trim(Mid(guidString, 2, 4))
    guidPart1 = Trim(Mid(guidString, 6, 4))
    guidPart2 = Trim(Mid(guidString, 11, 4))
    guidPart3 = Trim(Mid(guidString, 16, 4))
    guidPart4 = Trim(Mid(guidString, 21, 4))
    guidPart5 = Trim(Mid(guidString, 26, 6))
    guidPart6 = Trim(Mid(guidString, 32, 6))
    'Convert the hexadecimal to decimal
    oidPart0 = CLng("&H" & guidPart0)
    oidPart1 = CLng("&H" & guidPart1)
    oidPart2 = CLng("&H" & guidPart2)
    oidPart3 = CLng("&H" & guidPart3)
    oidPart4 = CLng("&H" & guidPart4)
    oidPart5 = CLng("&H" & guidPart5)
    oidPart6 = CLng("&H" & guidPart6)
    'Concatenate all the generated OIDs together with the assigned Microsoft prefix and return
    GenerateOID = oidPrefix & "." & oidPart0 & "." & oidPart1 & "." & oidPart2 & "." & oidPart3 & _
        "." & oidPart4 & "." & oidPart5 & "." & oidPart6
End Function


Set oShell = WScript.CreateObject ("WScript.Shell")
oShell.run "cmd /c Regsvr32 Schmmgmt.dll"

Set objFSO=CreateObject("Scripting.FileSystemObject")
outFile="C:\Users\Administrator\Desktop\oidInfo.txt"
Set objFile = objFSO.CreateTextFile(outFile,True)

'Output the resulted OID with best practice info
oidText = "Your root OID is: " & VBCRLF & GenerateOID & VBCRLF & VBCRLF & VBCRLF & _
    "This prefix should be used to name your schema attributes and classes. For example: " & _
    "if your prefix is ""Microsoft"", you should name schema elements like ""microsoft-Employee-ShoeSize"". " & _
    "For more information on the prefix, view the Schema Naming Rules in the server " & _
    "Application Specification (http://www.microsoft.com/windowsserver2003/partners/isvs/appspec.mspx)." & _
    VBCRLF & VBCRLF & _
    "You can create subsequent OIDs for new schema classes and attributes by appending a .X to the OID where X may " & _
    "be any number that you choose.  A common schema extension scheme generally uses the following structure:" & VBCRLF & _
    "If your assigned OID was: 1.2.840.113556.1.8000.2554.999999" & VBCRLF & VBCRLF & _
    "then classes could be under: 1.2.840.113556.1.8000.2554.999999.1 " & VBCRLF & _
    "which makes the first class OID: 1.2.840.113556.1.8000.2554.999999.1.1" & VBCRLF & _
    "the second class OID: 1.2.840.113556.1.8000.2554.999999.1.2     etc..." & VBCRLF & VBCRLF & _
    "Using this example attributes could be under: 1.2.840.113556.1.8000.2554.999999.2 " & VBCRLF & _
    "which makes the first attribute OID: 1.2.840.113556.1.8000.2554.999999.2.1 " & VBCRLF & _
    "the second attribute OID: 1.2.840.113556.1.8000.2554.999999.2.2     etc..." & VBCRLF & VBCRLF & _
     "Here are some other useful links regarding AD schema:" & VBCRLF & _
    "Understanding AD Schema" & VBCRLF & _
    "http://technet2.microsoft.com/WindowsServer/en/Library/b7b5b74f-e6df-42f6-a928-e52979a512011033.mspx " & _
    VBCRLF & VBCRLF & _
    "Developer documentation on AD Schema:" & VBCRLF & _
    "http://msdn2.microsoft.com/en-us/library/ms675085.aspx " & VBCRLF & VBCRLF & _
    "Extending the Schema" & VBCRLF & _
    "http://msdn2.microsoft.com/en-us/library/ms676900.aspx " & VBCRLF & VBCRLF & _
    "Step-by-Step Guide to Using Active Directory Schema and Display Specifiers " & VBCRLF & _
    "http://www.microsoft.com/technet/prodtechnol/windows2000serv/technologies/activedirectory/howto/adschema.mspx " & _
    VBCRLF & VBCRLF & _
    "Troubleshooting AD Schema " & VBCR & _
    "http://technet2.microsoft.com/WindowsServer/en/Library/6008f7bf-80de-4fc0-ae3e-51eda0d7ab651033.mspx  " & _
    VBCRLF & VBCRLF

objFile.Write oidText
objFile.Close
Ce script provient de la documentation Microsoft :
Au cas où Microsoft viendrait à le supprimer, il est disponible sur mon Git :
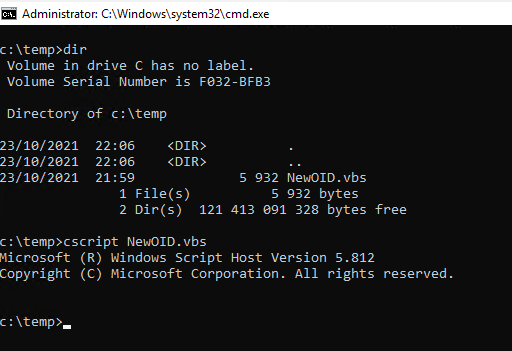
Ce script généré un fichier dans (chemin en dur dans le script) :
- “C:\Users\Administrator\Desktop\oidInfo.txt”
#############################################
Your root OID is:
1.2.840.113556.1.8000.2554.27004.2057.46652.20133.36015.10725918.7897929
This prefix should be used to name your schema attributes and classes. For example: if your prefix is “Microsoft”, you should name schema elements like “microsoft-Employee-ShoeSize”. For more information on the prefix, view the Schema Naming Rules in the server Application Specification (http://www.microsoft.com/windowsserver2003/partners/isvs/appspec.mspx).
You can create subsequent OIDs for new schema classes and attributes by appending a .X to the OID where X may be any number that you choose. A common schema extension scheme generally uses the following structure:
If your assigned OID was: 1.2.840.113556.1.8000.2554.999999
then classes could be under: 1.2.840.113556.1.8000.2554.999999.1
which makes the first class OID: 1.2.840.113556.1.8000.2554.999999.1.1
the second class OID: 1.2.840.113556.1.8000.2554.999999.1.2 etc…
Using this example attributes could be under: 1.2.840.113556.1.8000.2554.999999.2
which makes the first attribute OID: 1.2.840.113556.1.8000.2554.999999.2.1
the second attribute OID: 1.2.840.113556.1.8000.2554.999999.2.2 etc…
Here are some other useful links regarding AD schema:
Understanding AD Schema
http://technet2.microsoft.com/WindowsServer/en/Library/b7b5b74f-e6df-42f6-a928-e52979a512011033.mspx
Developer documentation on AD Schema:
http://msdn2.microsoft.com/en-us/library/ms675085.aspx
Extending the Schema
http://msdn2.microsoft.com/en-us/library/ms676900.aspx
Step-by-Step Guide to Using Active Directory Schema and Display Specifiers
http://www.microsoft.com/technet/prodtechnol/windows2000serv/technologies/activedirectory/howto/adschema.mspx
Troubleshooting AD Schema http://technet2.microsoft.com/WindowsServer/en/Library/6008f7bf-80de-4fc0-ae3e-51eda0d7ab651033.mspx
#############################################
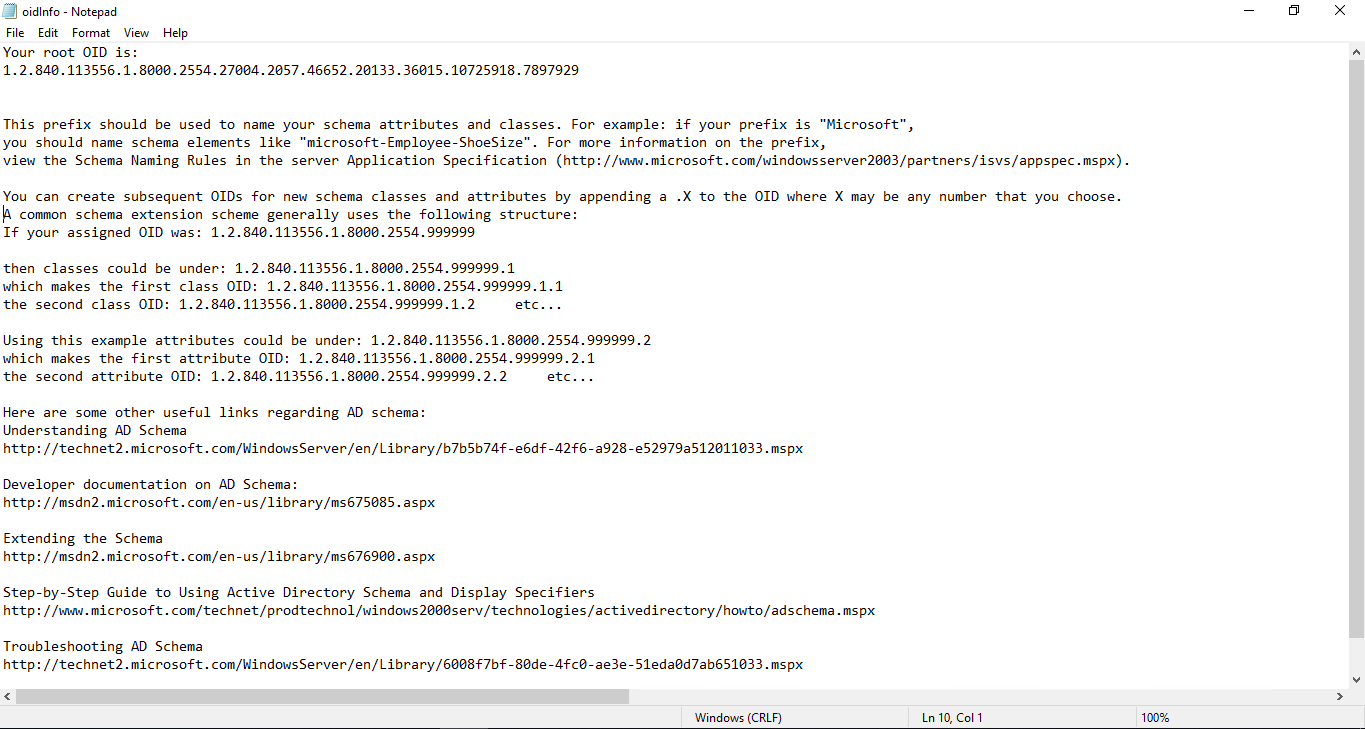
Alors qu’est ce que nous raconte ce fichier ?
Et bien que nous pouvons assigner des OID dans la plage “1.2.840.113556.1.8000.2554.999999”.
En dessous de cette branche libre à nous de nous organiser. Et surtout de gérer notre “plan d’adressage”.
Pour cet exemple, nous allons utiliser l’OID : 1.2.840.113556.1.8000.2554.999999.1.1
De retour sur la l’assistant de création d’attribut, renseigner le champ OID.
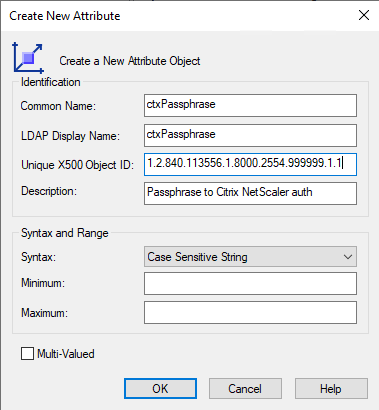
Notre nouvel attribut est créé.
Affectation de l'attribut à la classe user
Maintenant que l’attribut est créé dans le schéma AD, il faut le mapper à la classe “user” afin que celui-ci fasse partie des composants des utilisateurs AD.
Pour se faire, se rendre depuis la console mmc “Active Directory Schema” dans :
- Class –> user –> clic droit –> properties.
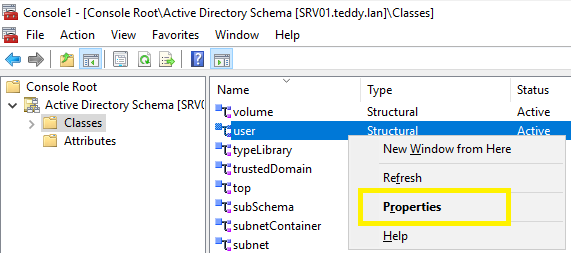
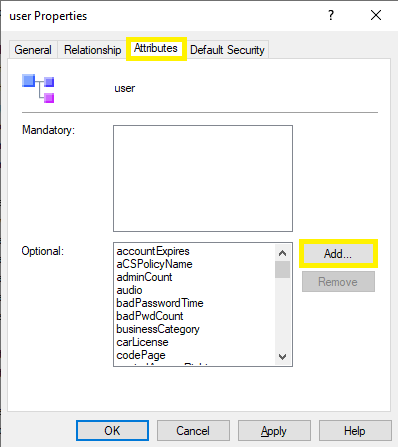
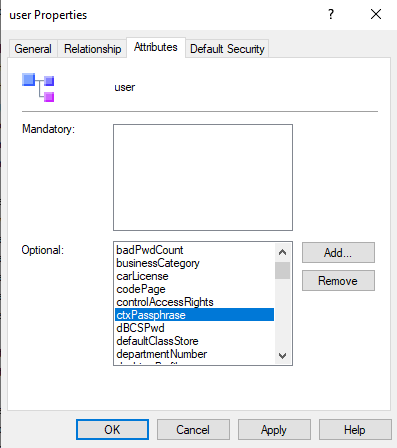
Puis depuis l’onglet “Attributes” –> “Optional” –> “Add”.
Séléctionner le nouvel attribut “ctxPassphrase”, puis cliquer sur “OK”.
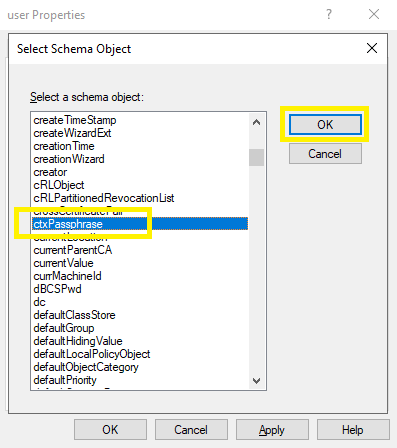
Le nouvel attribut est ajouté à la class “user”.
Mettre à jour le schéma AD
Se rendre dans la console “ADSIEDIT.MSC”.
Se connecter à la partition “Schema”.
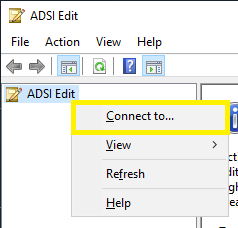

Réaliser un clic droit sur le noeud “Schema” et “Update Schema Now”.

Si la mise à jour du schéma ne fonctionne pas, redémarrer le serveur.
Consulter /utiliser le nouvel attribut
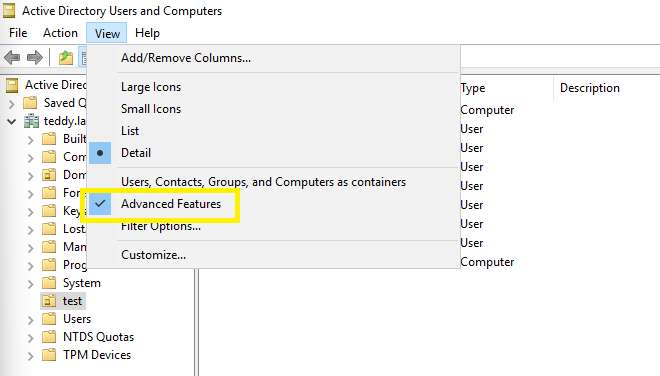
Se redndre dans la console “Active Directory Users ans Computers” ou “DSA.MSC” pour les intimes.
Passer en vue “Advanced Features”.
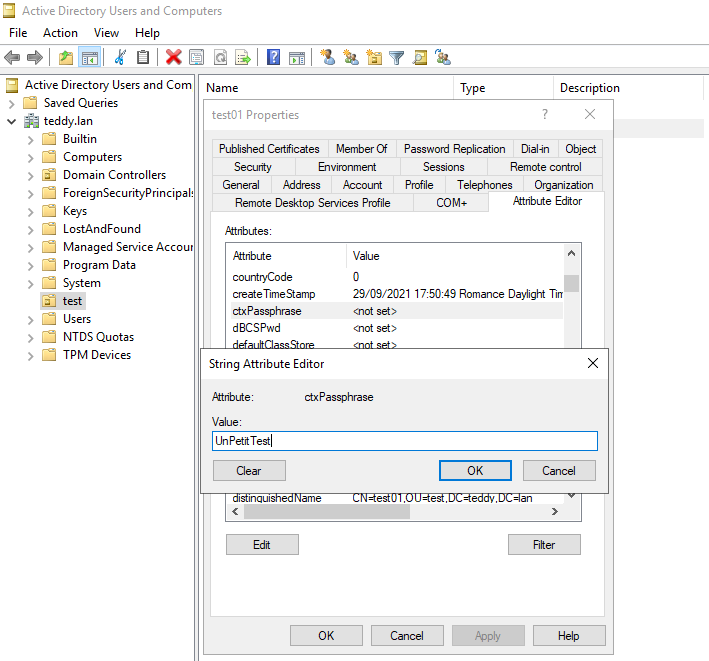
Puis dans la section “Attribut Editor” d’un utilisateur AD.
Nous pouvons constater que le nouvel attribut est préseaunt sur l’utilisateur et qu’il est possible de renseigner une valeur à celui-ci.
Pour aller plus loin
De retour dans la console “Active Directory Schema” si l’on retourne dans les propriétés de l’attribut, il est possible de modifier la portée de celui-ci.
Ceux-ci est de l’optimisation autour de la base de données AD, il est possible de réplique l’attribut sur les GC de la forêt, d’indexer celui-ci et plus encore.
